SOCIAL MEDIA

9/24/13

And Here It Is - The Third (And Final) Christmas Countdown Advent Calendar

Earlier this month, I posted two different Advent calendars that I made using upcycled items and "Tis The Season" beads from Prima Beads, and now I'd like to share the third and final advent calendar I made:


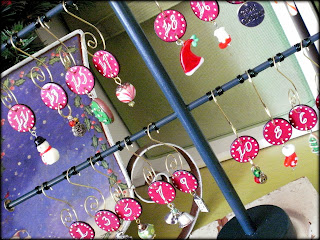
The base is made from a 16" wooden tree form from Woodworks, Ltd. that I spray painted a dark green.  I also spray painted 3/4" wooden circles in a deep red and doodled the numbers 1 - 25.


Using a small paper punch, I punched holes in the top and bottom of the circles, hung on various charms from both the 'Tis the Season line and others from my stash, and hung them on pre-made Christmas tree ornament hangers I found at Joann.

I then added coiled green wire to help hold the ornaments in place, and mounted the whole thing to an antique wood rosette that I found at a local salvage shop which makes the whole thing more stable.

So, there you are - three ways to make the countdown to Christmas more fun in your home:


Come back soon to see some fun holiday jewelry made using more of the "Tis The Season" beads from Prima Beads!


** Necessary Legal Stuff: I am honestly reviewing the products above which I have received free of charge from Prima Beads, and I have not been paid for my endorsement as it pertains to them.
9/21/13

Another Christmas Countdown

In my last "Christmas in September" post here I shared the first of three Advent calendars I made incorporating some of the "Tis The Season" beads from Prima Beads.  In this post I want to share the second Advent calendar with you:


I have been wanting to make one in this style for a couple of years now, and this gave me the perfect opportunity to try it out.


I started with a cupboard door that I found at a thrift store, painted it off-white and gave it a crackled aged finish.  Then I adhered the scrabble letters all around in fun holiday words and used my Faber-Castell Indian ink big brush pens to age them as well.


Then, using Christmas-themed scrapbook paper, I covered 25 wooden tags on both sides with the paper, sanded the edges, decoupaged down numbers from one to twenty-five in various sizes, styles and fonts, and aged them with the brush pens.  I then added various charms from the 'Tis the Season collection along with various other Christmas-y metal accents.


On the back side of each of the tags is a bible verse that, as they are turned over each day, will tell the Christmas story from different books of the bible, as well as talk about things like Joy and serving others.


In this close-up shot you can also see the fun 'Tis the Season charms I hung from the top corners with tartan plaid ribbon accents to highlight them.  

This project is one of my favorites I have ever completed, and I can't wait to use it this year.

Don't forget to check back soon to see the final Advent calendar soon!  I've also got some fun holiday jewelry to share with you!

** Necessary Legal Stuff: I am honestly reviewing the products above which I have received free of charge from Prima Beads, and I have not been paid for my endorsement as it pertains to them.
9/9/13

Countdown To Christmas

I've always wanted to make an advent calendar, and this year I've committed to making three - yes THREE - of them!  I want to share the first one with you today:

I've been itching to mosaic lately, and decided that this was a perfect project to break out (no pun intended) the red and green plates and get going.


First I found an 7" x 10" unfinished framed chalkboard at Woodworks, Ltd. and started gluing on the broken plate pieces.  For this type of project, I like the finished frame to look more chunky & rustic, and so I used larger pieces and let them hang over the sides of the wood.  I attached a teacup handle to use as a hook for hanging the chalk.

Next I grouted with an off-white color to further the rustic feeling of the finished piece, and then used a paint pen to write "Countdown To Christmas" on the top of the board, and do some doodling.


To incorporate the "Tis The Season" beads from Prima Beads, I coiled and flattened dark green artistic wire, carefully drilled holes through the grout, tapped in some nails and wound the wire ends around the nails after hanging the pre-made bead charms to the loops in the wire. 

For a final touch, I attached some beads to the ribbon holding the chalk as well:


I usually like to make my own charms, but these look great and saved me SO much time!  They come in a huge variety of colors and sizes, and are super-cute!

I am so happy with how the final piece came out.  Simple and sweet, and a great way to keep track of the days until Santa comes with your family!

While I was in the mosaic-ing mood, I made a couple of star ornaments using the same process:


Love these!!!

Come back to see more projects through the month using "Tis The Season" beads from Prima Beads


** Necessary Legal Stuff: I am honestly reviewing the products above which I have received free of charge from Prima Beads, and I have not been paid for my endorsement as it pertains to them.